 Pin it
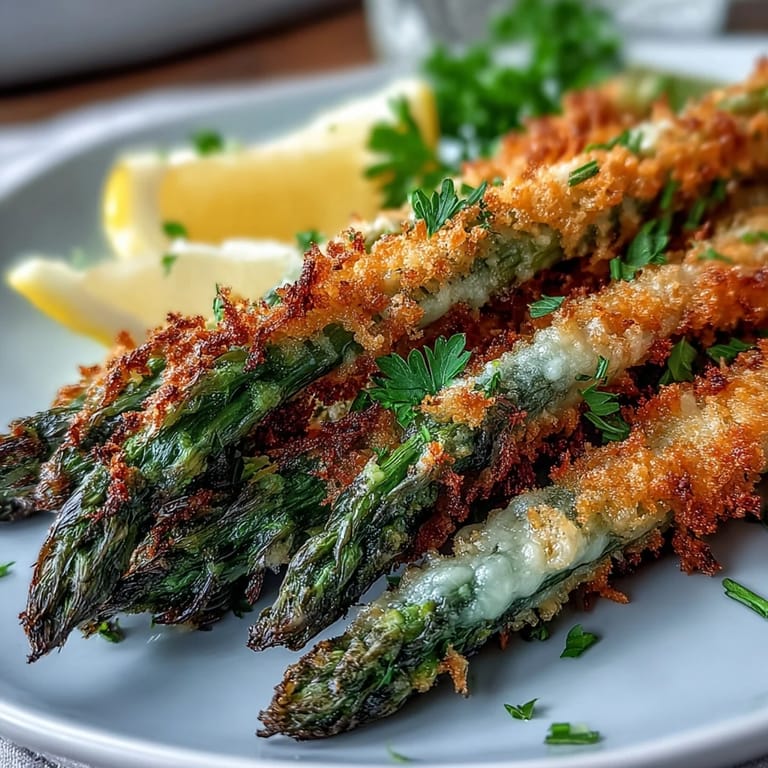
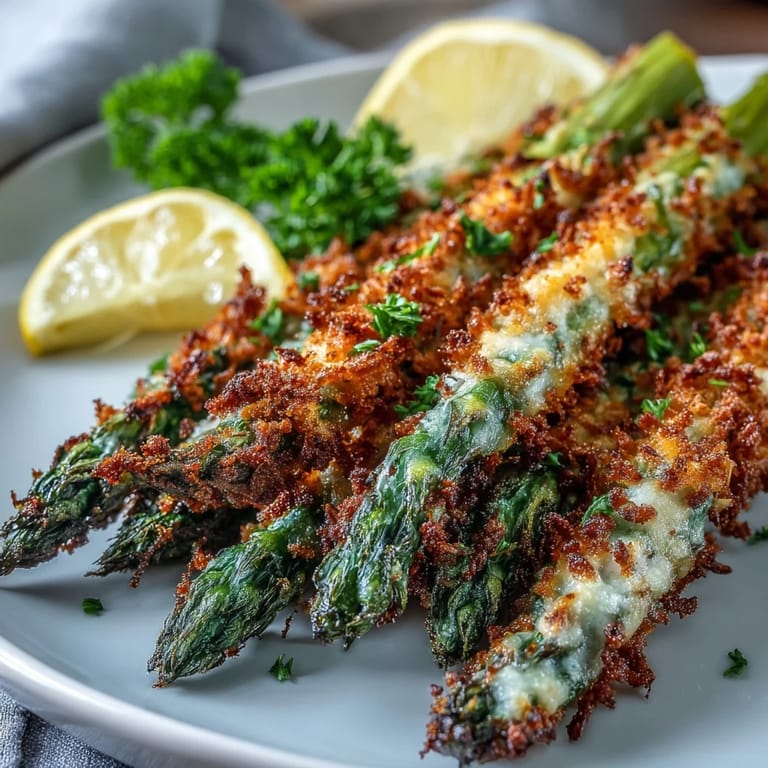
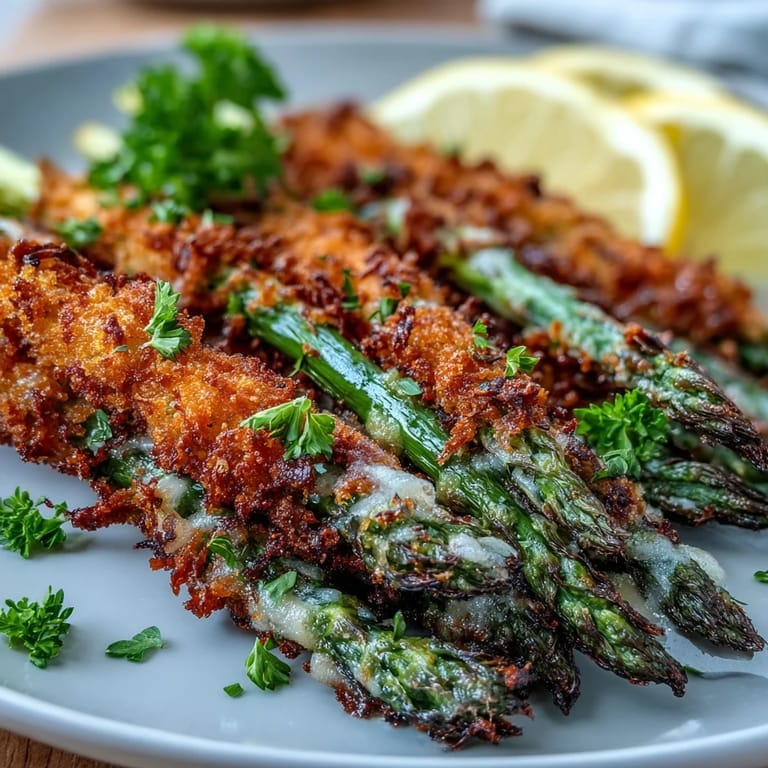
 There's something magical about the moment when crispy meets tender, and that's exactly what happens with these Asiago asparagus spears. My sister brought a batch to a potluck last spring, and I watched grown adults actually fight over the last few pieces, which I'd never seen happen with a vegetable before. That night, I went home determined to crack the technique myself, and after a few trials and one gloriously burnt batch, I finally nailed it. The secret, I learned, is all in how you handle the breading and that crucial moment when the cheese gets added right out of the oven.
I made these for my kids' school fundraiser bake sale and was shocked when they sold out before the brownies did. One mom came back the next week asking if I'd do a standing order, which made me laugh because I was literally just experimenting with panko at midnight the night before. But that moment taught me something important: people crave vegetables that don't taste like obligation.
Ingredients
- Fresh asparagus spears: Thicker spears (about the width of a pencil) stay tender inside while the coating crisps up beautifully, and patting them completely dry is non-negotiable for that crunch.
- All-purpose flour: This creates the crucial base layer that helps everything else stick, so don't skip it even though it seems basic.
- Egg and milk mixture: The egg is your adhesive and the milk keeps it from getting too thick, creating a smooth binding layer.
- Panko breadcrumbs: Regular breadcrumbs will work, but panko's larger flakes fry up infinitely crispier and stay crunchy longer.
- Asiago cheese: Finely grate it yourself if possible because pre-grated versions have anti-caking agents that can make the coating slightly grainy.
- Smoked paprika: This adds an unexpected depth that makes people ask what that incredible flavor is, and you get to smile mysteriously.
- Garlic and onion powder: Together they build a savory base without any moisture that might soften the crust.
- Olive oil: Just enough to encourage browning without making things greasy or soggy.
Tired of Takeout? 🥡
Get 10 meals you can make faster than delivery arrives. Seriously.
One email. No spam. Unsubscribe anytime.
Instructions
- Get your oven ready and prep your station:
- Preheat to 425°F and line your baking sheet with parchment, then drizzle it lightly with oil so the asparagus won't stick. Setting up three shallow bowls for your breading station before you start makes the whole process flow like a little assembly line.
- Dry your asparagus thoroughly:
- After rinsing, pat each spear with paper towels until they feel almost papery to the touch. Moisture is the enemy of crispiness, so don't rush this step.
- Snap or trim the tough woody ends:
- Bend each spear gently until it naturally breaks at the tender point, or use a sharp knife to cut about an inch from the bottom. This is actually satisfying and meditative if you let it be.
- Build your breading mixture with intention:
- In bowl three, combine panko, Asiago, Parmesan if using, and all the seasonings, then mix thoroughly so the cheese and spices are evenly distributed throughout the crumbs. You're creating a flavor-packed coating, so don't be timid with the mixing.
- Bread each spear with a gentle press:
- Coat in flour first and shake off excess, then dip into the egg mixture, then roll gently in the panko mixture while pressing slightly so crumbs actually stick instead of just sitting on top. Work in batches so you're not overwhelmed, and if the breading starts getting wet, grab a fresh batch of coating.
- Arrange with breathing room:
- Lay each coated spear on the baking sheet in a single layer with a little space between them so hot air circulates and they get evenly crispy all around. Crowding them is the quickest way to end up with steamed asparagus instead of crunchy spears.
- Oil everything lightly for maximum crunch:
- Drizzle or spray the remaining olive oil over all the spears and gently turn each one to make sure every side gets lightly coated. Even coverage here means even browning and that coveted all-over golden color.
- Bake with a strategic flip:
- Bake on the middle rack for about 10 to 12 minutes for medium spears, turning them halfway through so both sides get direct heat. You'll know they're done when the coating is golden-brown and crispy and the asparagus tips are just starting to show char at the edges.
- Optional broil for deeper color:
- If you want an extra-dark golden crust, broil for just 1 to 2 minutes at the very end, but stay right there because it can go from golden to burnt in the time it takes to blink.
- Finish with fresh cheese and garnish:
- The moment they come out, sprinkle the remaining Asiago while everything is still hot so it gets slightly melty and clingy. Add parsley, chives, or red pepper flakes if you're feeling fancy, and serve with lemon wedges and whatever dipping sauce makes your heart happy.
 Pin it
 The real magic moment came when my partner grabbed one straight off the cooling rack and actually closed his eyes while eating it, that kind of involuntary response you can't fake. He said it tasted like someone figured out how to make vegetables taste like an indulgence, and honestly, I think he was right.
Thickness and Timing
Asparagus spear thickness matters more than you'd think because thin spears cook through in about 8 to 10 minutes while thicker ones might need the full 12 to 14. I learned this after pulling out thin spears that were perfectly done while the thick ones in the same batch still had a slight snap when they should have been tender. Now I try to grab spears that are roughly the same thickness so everything finishes together, but if you're stuck with mixed sizes, you can just arrange them on the sheet by thickness and pull the smaller ones out first.
Make-Ahead Magic
One of my favorite discoveries is that you can coat these spears up to 4 hours ahead and just pop them in the oven when guests are about to arrive. This means you can do all the messy breading work on your schedule, refrigerate them uncovered so the coating dries slightly and gets even crispier, then bake them fresh while you're setting the table. It's genuinely the perfect dinner party move because it looks like you spent more time in the kitchen than you actually did.
Flavor Variations and Serving Ideas
Once you master the basic technique, this recipe becomes a playground for experimentation. I've added lemon zest to the panko mixture on nights when I wanted brightness, tried a touch of cayenne pepper for heat, and even experimented with adding a tiny bit of finely minced rosemary for an earthy twist. The dipping sauce is equally important because these spears are versatile enough to pair with anything from a simple aioli to a lemon-garlic yogurt sauce to marinara if you're feeling Italian. They're equally happy alongside roasted chicken, folded into a salad, or eaten standing at the kitchen counter when you think nobody's watching, which is honestly my favorite way to enjoy them.
- Try brushing the baked spears with a thin layer of pesto or chimichurri for a completely different flavor profile.
- Grated Pecorino Romano makes an excellent substitute if you can't find Asiago, and the flavor actually shines through beautifully.
- Don't skip the lemon wedges because the brightness cuts through the richness and makes every bite feel fresh and alive.
 Pin it
 These asparagus spears have become my secret weapon for turning skeptics into vegetable lovers and for making weeknight dinners feel a little more special. Every time I make them, I remember that moment at the potluck and smile.
Recipe FAQs
- → What type of asparagus works best for crispy coating?
Medium to thick asparagus spears hold up best during the coating process and baking. Thinner spears can become too soft or overcook before the crust achieves proper crispiness. Look for bright green, firm stalks with tight tips and avoid woody or excessively thin specimens.
- → Can I make these ahead of time?
Yes, you can coat the asparagus spears up to 4 hours in advance and refrigerate them on the baking sheet, covered loosely. Bake just before serving for the crispiest results. The coating may soften slightly during refrigeration but will crisp up beautifully in the oven.
- → What dipping sauces pair well with these spears?
Lemon-garlic aioli, tangy yogurt sauce with herbs, or warm marinara all complement the cheesy, crispy coating beautifully. A simple wedge of fresh lemon also works wonderfully—the acid cuts through the rich Asiago crust and brightens each bite.
- → Can I air fry these instead of baking?
Absolutely. Cook at 390°F (200°C) for 7–10 minutes, turning halfway through. Air frying yields exceptionally crispy results with less oil. Work in batches if needed to avoid overcrowding, which can lead to steaming instead of crisping.
- → Why use panko instead of regular breadcrumbs?
Panko breadcrumbs create a lighter, airier crust that stays remarkably crisp. Their larger, flaky structure creates more surface area for crunch, while regular breadcrumbs tend to become dense and soggy. The coarse texture also holds onto the grated cheese exceptionally well.